17.08.2020

Avery Elle … Poppies (with video)

Hey there! Sharing a card (and video) with all you Avery Elle fans today featuring the Poppies set. One of my favourite plants is the poppy. I love their paper-like petals and the range of colours from deep, bold reds and pinks to soft pastel shades. of every colour. I knew we had to add a stamp set dedicated to these beautiful flowers to the Avery Elle inventory!

I’ve created a wee video just to show how this simple card came together.

https://vimeo.com/448309144

For my card today I decided on a pastel pink variety. I stamped all of the images with New Moon dye ink as I wasn’t sure exactly what arrangement I had in mind to begin with. I coloured the images with Copics and die cut them.

I created a mat using the Wonky Stitches die and mounted it using foam tape onto a white A2 card front. I then added the garland image and placed the single large poppy image (which matches the one in the garland) over the top to add dimension. I added the other images in a small arrangement in the opposite corner using liquid adhesive and foam tape.

To finish I added some sparkle with a glitter brush pen and some Essentials By Ellen heart shaped drops and the sentiment from the Poppies set.

Supplies:

Poppies Clear Stamps

Poppies Elle-ments

Wonky Stitches Elle-ments

New Moon Dye Ink

Liquid Adhesive

16.08.2020

Avery Elle … Sun’s Out and Whiskers

Hey there, here today sharing two cards that are sure to brighten the dullest day!
First up is the this card featuring the sweet Sun’s Out set.  Isn’t it the cutest?

I started with  a square card base and die cut the Sea Scene Elle-ments from some paper from the Spring Paper Collection pad die and added some silver glitter paper behind it where the wave shapes show through.  I kept the positive elements and added them to the card base for background texture.
Next I stamped and die cut some flowers and foliage from the Tropical Bouquet stamp set and added it to the card using it to frame the focal point for a bright and summery look.

To finish I used one of the speech bubble dies from the Peek-a-Boo Pals die set and stamped the cute sentiment in black ink and added some glaze to the shades!
My second card is a clean and simple idea using one of the cat images from the Whiskers stamp set.  I stamped the cat and coloured her using Copics.  Next I used the pink/blue pastel ombre paper from the Spring Paper Collection and die cut the frame using the Hearts Frame die.

I die cut and stamped a banner for my sentiment using Banner Bits and finished it all off with a few stamped hearts.

Supplies:
Suns Out Clear StampsSuns Out Elle-mentsSea Scene Elle-ments Tropical Bouquet Clear StampTropical Bouquet Elle-mentsPeek-a-Boo Pals Elle-ments
Whiskers Clear StampsWhiskers Elle-mentsHearts Frame Elle-mentsBanner Bits Clear StampsBanner Bits Elle-mentsSpring Paper Pad Collection

16.07.2020

Avery Elle … Unicycle and Big Congrats

Hello there, here today sharing two cards featuring some fabulous products from the latest Summer release.  
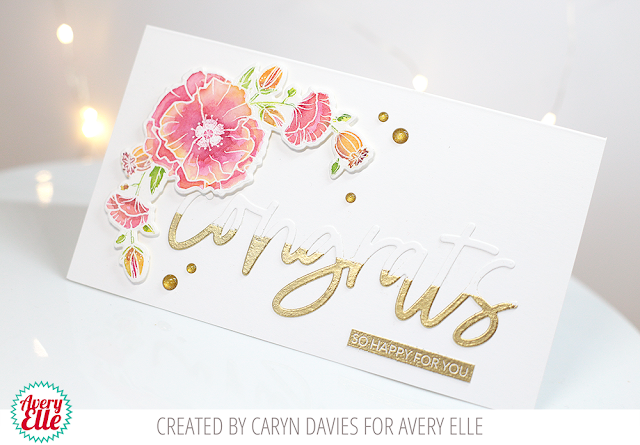
The first card features two new sets – Big Congrats and Poppies.  I thought it was high time I dusted off my Avery Elle Liquid Watercolours and the Poppy images in this set are perfect to show off the delicate colours and effects you can create. 
First I stamped the the poppy garland image in Versamark and heat embossed it in white.  I “coloured in” the image with plain water to begin with so I could drop tiny amounts of the liquid watercolour onto the design.  I love the way the two colours merge and mingle together creating an almost translucent appearance – just like a real poppy!  I used Cherry and Fizz liquid watercolours on the flowers and a combination of Lemongrass and Jungle  for the foliage.

I set the image aside to dry and then die cut the Congrats die from the Big Congrats set in white.  I was going to leave. it like that for a tone on tone effect but I decided it needed a bit “more” so added versamark to the bottom half and then heat embossed it in gold for a dipped effect.  I stamped and heat embossed the “So Happy For You” block also.

Finally I assembled my card.  I wanted the card to be a bit bigger than the standard A2 size so I created a custom size of 4′ x 7′.  This gave my design a much better look and allowed me no avoid the card looking crowded.  Sometimes we forget we can create a card ANY size we like, lol!  I added the die cut floral image using foam tape and the congrats sentiment die cuts using liquid adhesive.  For a final flourish I added some enamel dots to tie in the gold on the sentiment.

My second card today is a bit more childlike and features the fabulous Unicycle stamp set.  It would be great for a little boy and I happen to have a nephew with a birthday coming up soon so this should come in handy!

I cut a panel of the blue star paper from the Spring Collection paper pad and adhered it to the A2 white card base.  I then stamped the cute rhino and unicycle along with the wee birthday cake and coloured them using Copics.  

I die cut the images, adhered them to the card and stamped the sentiment.Whenever I see the chance to use a pom pom on a card I don’t waste it so his hat just had to have one!

Supplies used:


Card 1

Big Congrats Clear Stamps

Big Congrats Elle-ments

Poppies Clear Stamps

Poppies Elle-ments

Liquid Watercolours

Gold Embossing Powder

White Embossing Powder

Liquid Adhesive


Card 2

Unicycle Clear Stamps

Unicycle Elle-ments

New Moon Dye Ink

Spring Collection Paper Pad