28.01.2019

Avery Elle … Some Bunny

Hey there, I’m over on the Avery Elle Blog today with a cute little card using the gorgeous Some Bunny stamp set.

To start I used a pink card base and die cut a panel using Wonky Stitches and the large frame from Wonky Circle Frames.  I laid the elements out so I would know where I wanted to blend my ink and then used a blending brush to add some soft colour (Magenta and Orchid pigment ink) to the centre of where I planned to put my Wonky Circle Frame die cut.

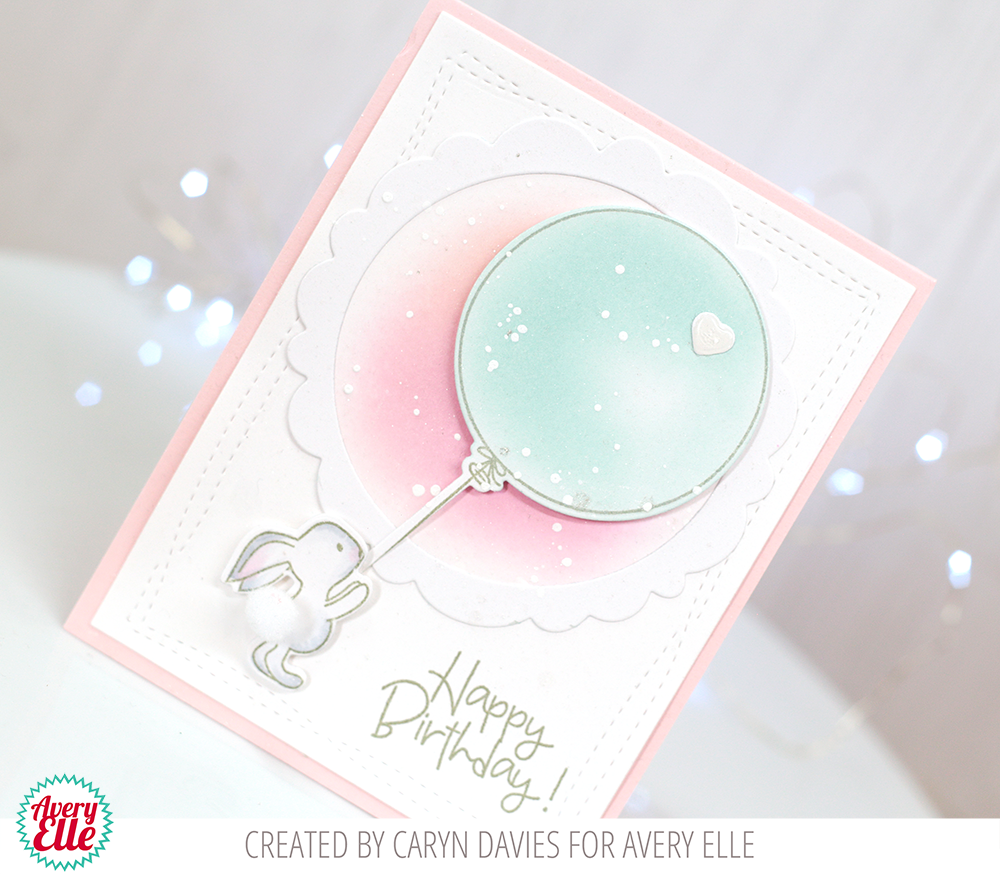
I stamped the bunny and balloon in Fog dye ink and then blended Sea Glass ink into the balloon and added a tiny bit of grey to the bunny using  Copic markers (C0 and C2 and R81).  I used a heart from the Some Bunny dies and adhered it onto the balloon then assembled my card using foam tape for the bunny and balloon.

To give the card a little more texture I used Unicorn White paint from Hero Arts and splattered it over the card front.  I added some Diamond Glaze to the heart and finished it all off with a cute little pom pom on the bunny’s tail!!

Supplies:

Some Bunny Clear Stamps

Some Bunny Elle-ments

Wonky Stiches

Wonky Circle Frames

Magenta Pigment Ink

Orchid Pigment Ink

Sea Glass Pigment Ink

Fog Dye Ink

20.12.2018

Get Cracking – for the last time!

Hey there.  It’s time to share the last “Get Cracking On Christmas” card of this year.  It’s been fun playing along with my fellow crafters Jenn Shurkus, Chari Moss, Cheiron Brandon and Libby Hickson.  Whilst I haven’t had time to join in every month, it has been so helpful to keep me from ending up with that last minute rush in December!

For my card this month I have been playing with diffent supplies from different companies and combined them in a fusion of rustic goodness!  I started with a stone coloured card base and stamped the Wood Plank background stamp from My Favourite Things in Desert Sand ink.  In the corner I stamped one of the Corner Sentiments: Christmas stamps from Avery Elle in Truffle dye ink (also Avery Elle).  For the main feature of my card I used the Poinsettia and Pine stamp set from Altenew.  I stamped the element s in Versa fine Clair ink in Acorn and then coloured with Zig Clean Colour markers.  I gave everything a frosty look using White Puff Twinkle embossing powder from Wow.


Thanks so much for stopping by and Merry Christmas to you all xxx

17.12.2018

Avery Elle … Simple Sentiments

Hey, I’m on the Avery Elle Blog today with a card showing a way to use the Simple Sentiments stamp set.  I decided to use the “Thank You” related sentiments in the set together to create a tone on tone background for a subtle way to include a sentiment without the need for a strip or open space.

I started with a bright green piece of card and stamped the sentiments in Celery pigment ink to cover the panel.  I then used a piece of Celery striped paper from the Jewel Paper Pad and adhered it to the lower section and then die cut it using Double Pierced Rectangles to create the mat.  I added some silver sparkle washi tape along the join.

I used the Wonky Scalloped Circle Frame for more interest in the background and then stamped and coloured (using Zig Clean Colour Markers) the Floral Bouquet image before die cutting and adding to the card front.  To finish I added some glitter to the flower centres.

Supplies:

Simple Sentiments Stamp Set

Floral Bouquet Stamp Set

Floral Bouquet Elle-ments

Wonky Circle Frame

Celery Pigment Ink

Jewel Paper Pad Collection

Dotted Rectangle Elle-ments